

Table of Contents
Intro
This is the first out of a series of articles where I’ll present a sample NodeJS project and deploy it to a Kubernetes cluster using Amazon Elastic Kubernetes Service (EKS).
I’ll also set up a Continuous Integration pipeline using Travis CI.
This demo system contains a few “microservices” and an Angular front end built with the Ionic framework.
The components are relatively simple, allowing us to focus more on the deployment pipeline. Still, there are quite a few practical aspects like integrating with S3 and PostgreSQL via Amazon RDS.
I completed this project as part of the Cloud Developer Nanodegree at Udacity. You can find the source code on GitHub.
In this first part, we’ll go through the following:
- Present the overall functionality and business rules
- The System Architecture
- PostgreSQL set up with Amazon RDS
- S3 storage for images
- Users registration and login process – hashing and generating JWT tokens
- Dockerizing all the components
- Run everything locally with Docker & docker-compose
Also, see my previous article on deploying a Node app on AWS using Elastic Beanstalk.

About the Nanodegree
The Nanodegree will train you in critical AWS skills to become an effective cloud developer.
Some of the covered topics are:
- Cloud Computing in AWS
- Storage & Content Delivery
- Cloud Security
- Networking & Elasticity
- Deployments via AWS Elastic Beanstalk
- Microservices Design Principles
- Messaging & Containers, Docker
- Containers orchestration with Kubernetes in AWS
- Serverless apps, Lambda functions, Auth
Each of the main sections ends with a small project where you can interactively put your knowledge into action.
Also, you’ll get to complete a final Capstone project putting together most of the concepts you go through during the learning journey.
Don’t let the pricing discourage you – at the time I took the Nanodegree, every customer could use a discount coupon that reduces the cost by up to 90%!
Project Overview
The system, called “Udagram” (a combination of “Udacity” and “Instagram”), is about posting pictures with captions for them.
Here’s a preview:

First, you need to go through the logging process to register a new user:

Then, you can create a new post by uploading the image and writing a caption.


At this point, you’ll see the uploaded image in your feed (home page).
System Architecture
A visual representation of the System Architecture looks like so:

Note: For this article, all of these components will run locally. By the end of the series, the system will be fully deployed and operational on AWS EKS.
Let’s walk through each of the modules.
Front End App
The front end is a simple Angular app built with the Ionic framework.
NGINX Reverse Proxy
The reverse proxy service adds another layer between the front end and back end APIs so that the front end only uses a single logical endpoint. Behind the scenes, the API calls will be redirected to the appropriate microservice, but this stays hidden for the client.
If you’d like to dig deeper into the proxy configuration, check the NGINX config file.
Feed Service
The Feed Service responsibilities are:
- Get all the images for the user’s feed. The API would return just the metadata for each image, like the caption and its pubic link. This link is generated as an S3 presigned URL.
- Get an image by ID.
- Get a presigned URL the client would use to upload the actual image to the S3 bucket.
- Store the image metadata.
Users Service
The Users Service responsibilities are:
- Register a new user. For demo purposes, we are using the bcrypt library to salt and hash the user password. The registered user is stored in Postgres.
- Log in. The password goes through the same hashing procedure. Once the user is verified to exist in the DB, a JWT token is generated and returned to the client.
PostgreSQL
The Postgres DB stores the users and the image’s metadata – image name, caption, etc.
S3 Bucket
The S3 bucket stores the actual images.
Initial Setup
Let’s go through the steps we need to complete in order to have a working environment.
Setup IAM User and AWS CLI
First, you need an IAM user to access the S3 bucket programmatically.

Then you’ll have to install the AWS CLI. Find the installation steps for your environment here.
During your user creation steps, you will obtain an AWS Access Key ID and AWS Secret Access Key. You need to configure AWS CLI to use these, as explained here.
If you follow the instructions, the user will be set as the “default” profile for AWS CLI, which you’ll later assign to an environment variable. This, in turn, will be used when running the Docker containers.
Create the S3 Bucket
Next, make sure you create the S3 bucket itself:

You need CORS enabled for the bucket:

You can do that by pasting in the following JSON:
[
    {
        “AllowedHeaders”: [
            “*”
        ],
        "AllowedMethods": [
            "POST",
            "GET",
            "PUT",
            "DELETE",
            "HEAD"
        ],
        “AllowedOrigins”: [
            “*”
        ],
        "ExposeHeaders": []
    }
]
Create the Postgres DB with RDS
You’ll have to create a new Postgres database via the RDS console.
The creation process is straightforward. You can use a cost-effective instance like db.t3.micro as I did.
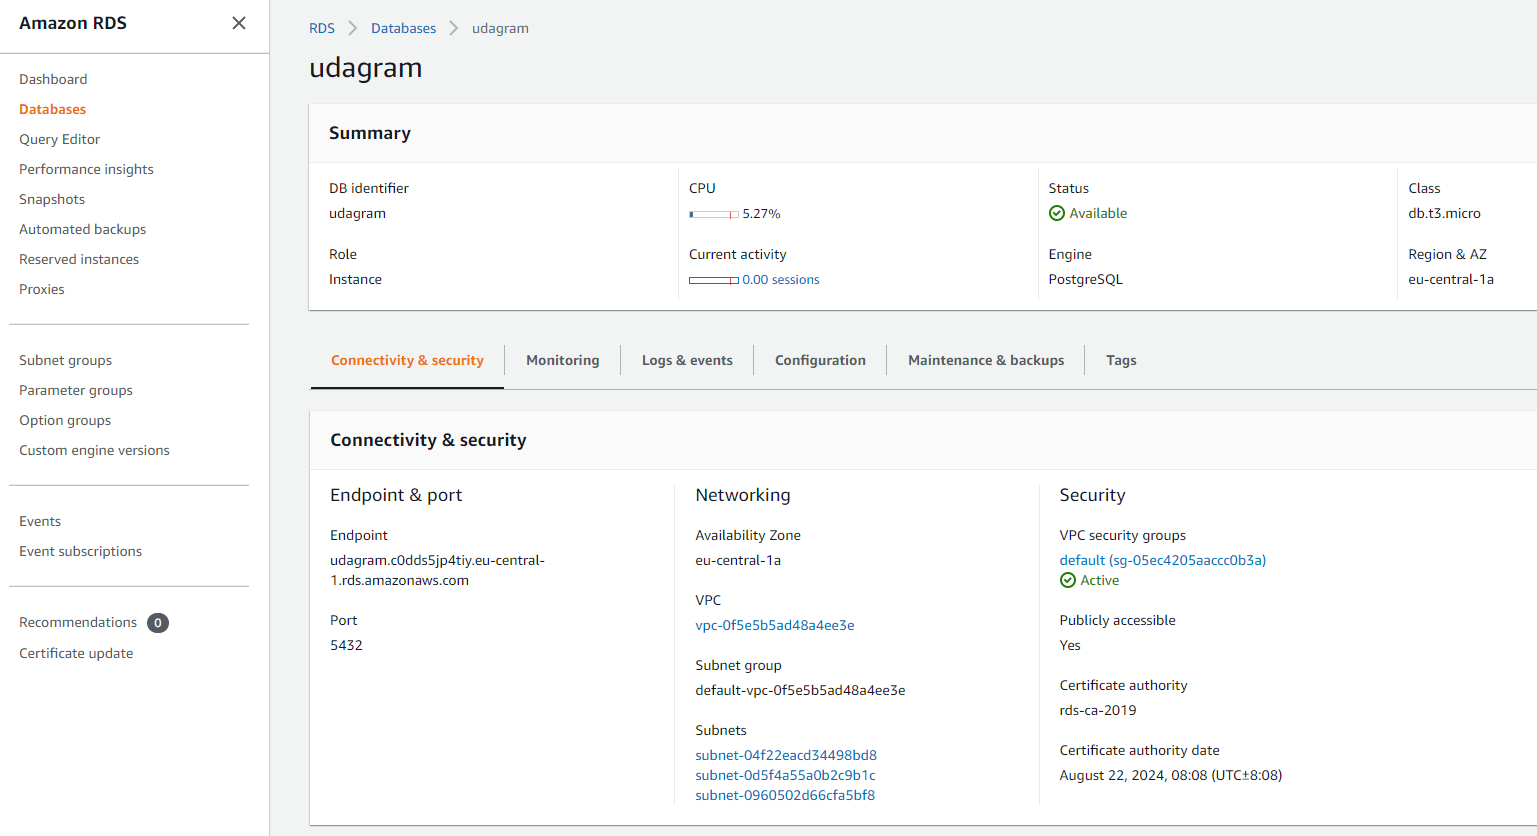
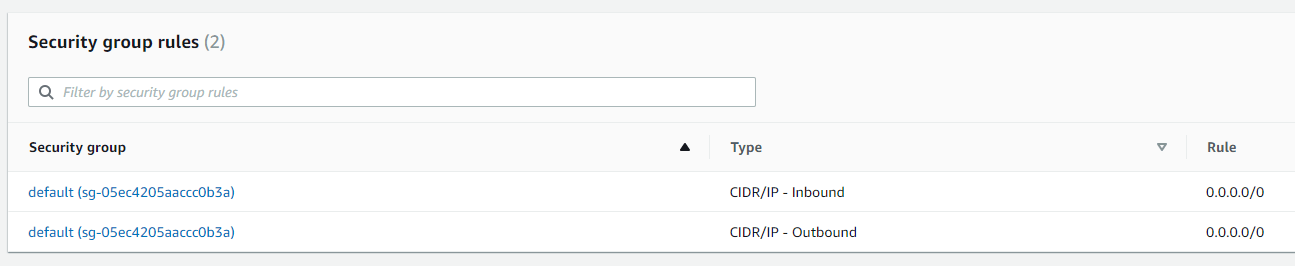
For this article, you’ll be running the system locally on your dev machine. This means you must set up your database to be publicly accessible. To do so, you should allow inbound traffic from any IP address like shown below:
Once we complete the Kubernetes deployment, we’ll be able to forbid inbound connections from outside of our AWS infrastructure.
In order to access your PostgreSQL instance, you can either directly use the terminal, via psql, or download a visual IDE like Postbird:

When you run the project for the first time, it will automatically create the required tables. If you upload some images, you should see DB entries like the ones below:

Environment Variables
Running the project depends on quite a few configuration values. These values are sensitive information that should not be directly stored in your Git repo.
The usual approach is to utilize environment variables in order to pass in the sensitive data to the application.
There’s a helper file in the root directory, called set_env.sh, where you can see the required configuration parameters:

Again, this file is used only for local development convenience for this demo project. Make sure you don’t store your real credentials in Git!
You need to set these environment variables on your machine before running the project in Docker. The exact mechanics of updating your environment variables depends on your OS/distro.
For Ubuntu, you can execute source set_env.sh to load the variables for your current terminal. Another option is to set them globally by updating the .bash_profile file.

In the next article, we’ll set these variables in Travis CI in preparation for running the system in Kubernetes.
Running Everything Locally in Docker Containers
It’s time to containerize the system.
First, we need to build the docker images for every component. To do so, you’ll see a Dockerfile for every module in its respective directory:
udagram-api-feedudagram-api-userudagram-reverseproxyudagram-frontend
Here’s an example of the Feed Service Dockerfile:

Next, inspect the docker-compose-build.yaml file in the root directory:

This allows you to build all the required Docker images with a single command:
docker-compose -f docker-compose-build.yaml build --parallel

Once we have the Docker images, you can explore the docker-compose.yaml file that will help us run the containers:

To run all the required containers, just execute the following command in the root directory:
docker-compose up
At this point, all of the containers should be up and running. If you do docker ps in a new terminal, you should see something like this:

Now, you can visit http://localhost:8100 in your web browser to verify that the application is up and running.

Of course, initially, you will have to go through the registration process and upload a few images to see them on the home page.
Summary
In this article, you explored how to run the Udagram demo app locally using Docker containers.
Next, I’ll set up Continuous Integration for the project using Travis CI.
Subsequently, I’ll put everything together and deploy the whole system in Kubernetes using AWS EKS.
See you next time!


