

Table of Contents
Intro
In this article, you will learn:
- What is Debezium, and how it unifies the process of streaming change events from different databases.
- How to set up Debezium Kafka Source Connector to stream MongoDB events to Kafka topics.
- How to consume the streaming events with a C# client app.
Here’s the data flow we’ll cover:

You can also visit the Github repo.
Let’s get started!
Debezium
A while ago, I was listening to an episode of the Data Engineering Podcast about Debezium.
It covered a widespread problem in systems design that can be very painful to solve – streaming change events from your database(also known as Change Data Capture – CDC).
Here are a few cases when you may need that:
- Generate read-optimized data views
- Update search indexes
- Purge a cache
- Any type of a “follower” system that needs to be kept in sync with the “leader”
From my experience, many teams still come up with a custom solution – most often some sort of tailing the append-only event log of the database (“transactions log”/”binlog”/”oplog” – choose the right word for your DB).
Debezium handles that for you uniformly in a reliable and scalable manner:
“Debezium is an open source distributed platform for change data capture. Start it up, point it at your databases, and your apps can start responding to all of the inserts, updates, and deletes that other apps commit to your databases. Debezium is durable and fast, so your apps can respond quickly and never miss an event, even when things go wrong.” – Source
Debezium is built on top of Apache Kafka (*), which is proven to be very scalable and to handle a large volume of data quickly.
(*) Except for simpler cases when you can use the Debezium Engine to embed connectors directly within the application space.
The way Debezium connects to your database (MongoDB in our case) is by implementing a Kafka Source Connector.
Kafka Connect
Kafka Connect is a tool for streaming data from and into Kafka.
For a deep dive into Kafka Connect, I’d recommend the following Pluralsight and Udemy courses:
Kafka Connect supports two types of connectors:
- Source Connectors – for ingesting external data into Kafka topics. This external data may come from various sources like NoSQL/Relational databases, message queues, S3 buckets, etc. In this article, we’re using MongoDB as a data source.
- Sink Connectors – for delivering data from Kafka topics into some external downstream systems/storages like Elasticsearch, Hadoop, etc. Sink connectors are not covered in this article.
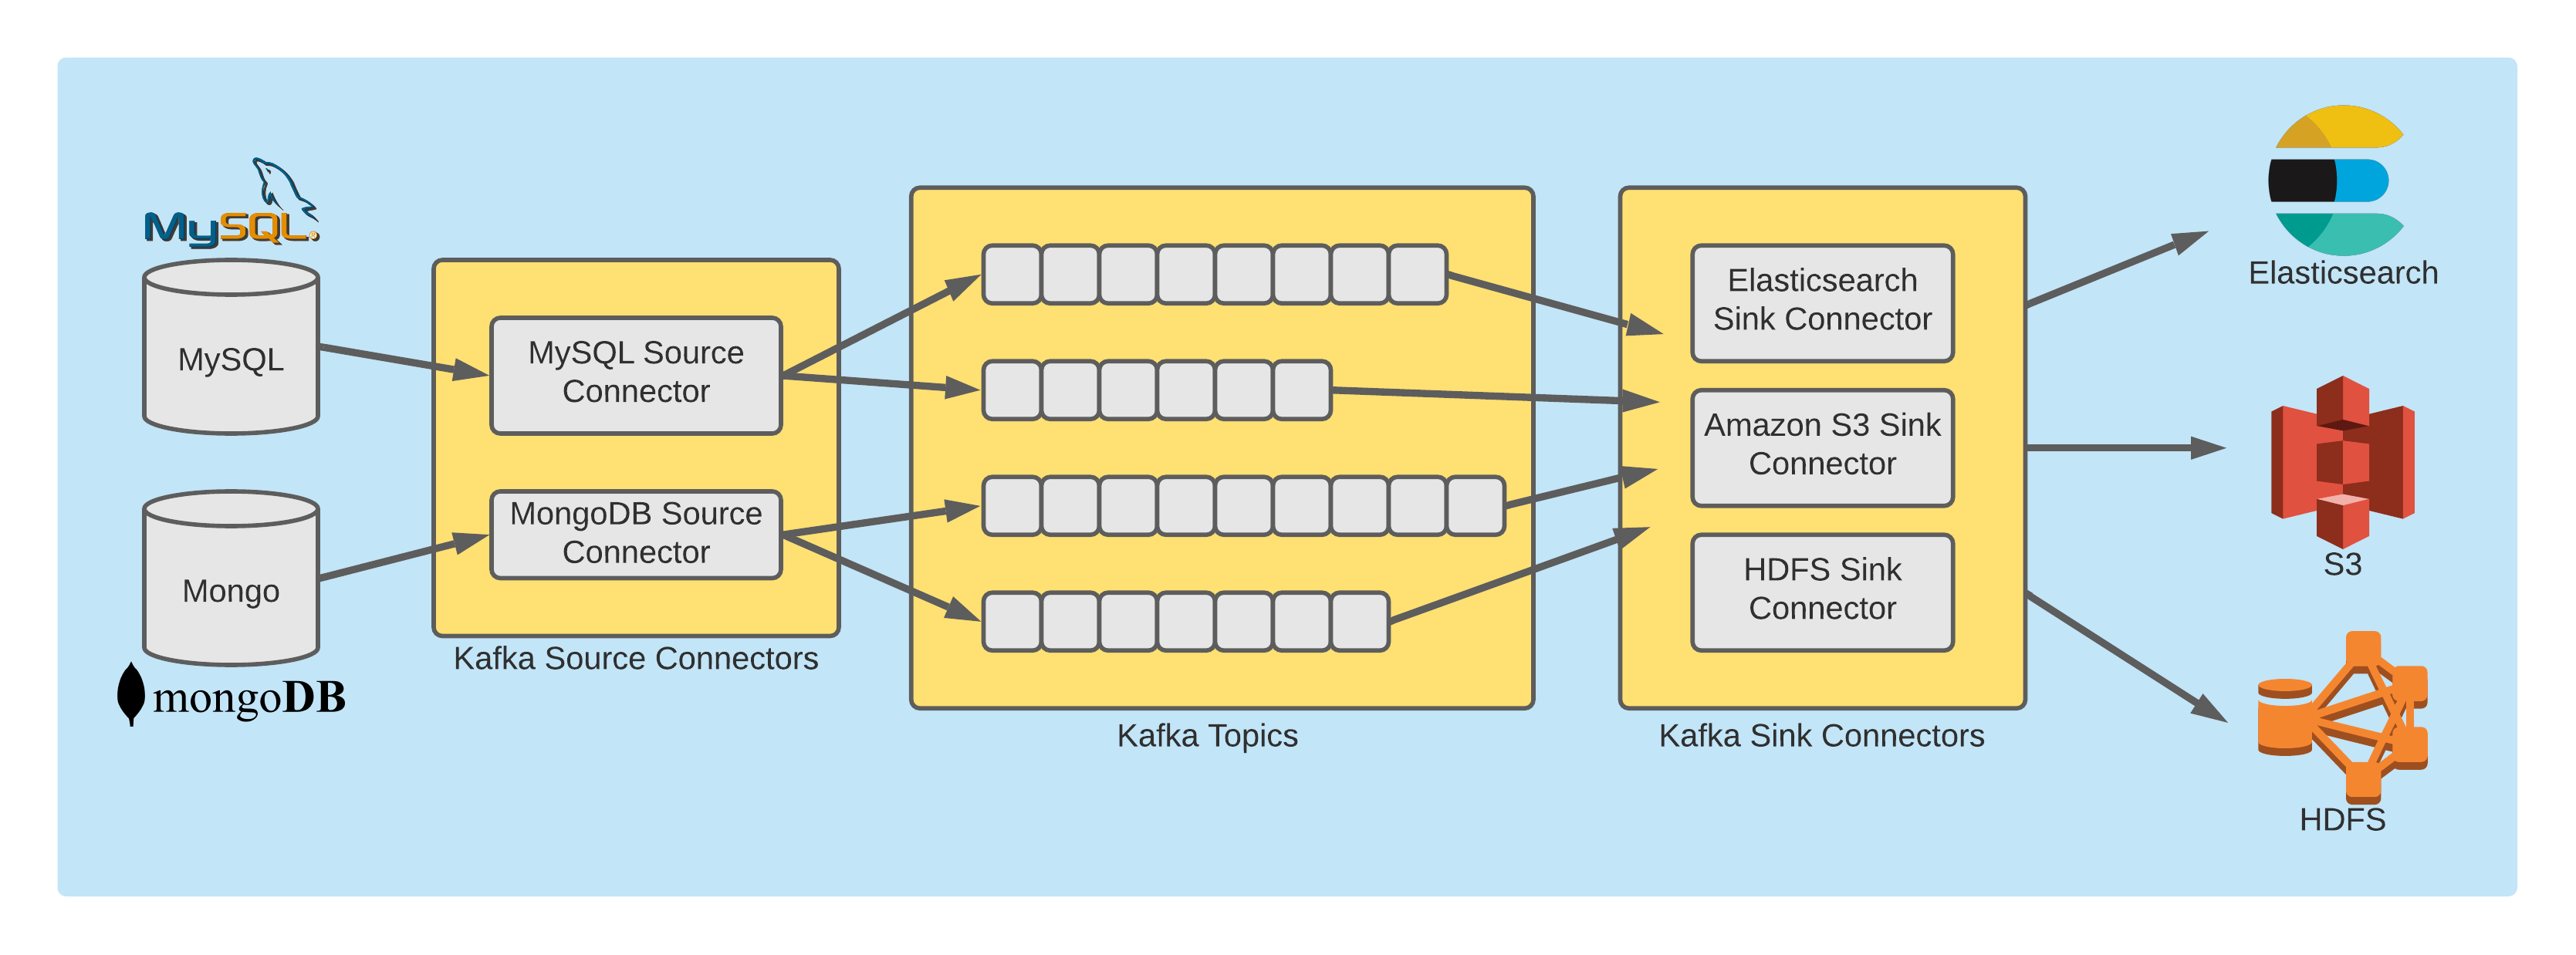
The overall Kafka Connect architecture with Source and Sink Connectors looks like so:
Again, in this post, we are interested in Source Connectors and specifically the Debezium Source Connector for MongoDB.
Kafka Connect Hands-on Learning
Learn How to Source Twitter Data, Store in Apache Kafka Topics & Sink in ElasticSearch and PostgreSQL
Source Connectors
Kafka Connect API represents a “plugin” architecture that allows you to write your own source connectors by implementing a few Java interfaces and putting the JAR files in the right places:
“The Kafka Connect API allows you to plug into the power of the Kafka Connect framework by implementing several of the interfaces and abstract classes it provides. A basic source connector, for example, will need to provide extensions of the following three classes: `SourceConnector`, `SourceTask`, and `AbstractConfig`. Together, these define the configuration and runtime behavior of your custom Kafka connector.” – Source
In the recommended Udemy course, you’ll go through a step-by-step guide on implementing your own Connector for ingesting via the GitHub API.
Another beneficial exercise is to review the actual Debezium Mongo Connector implementation.
Debezium Connector vs. Native Mongo Connector
Soon after starting my learning journey with Debezium and Mongo, I noticed that Mongo Inc had provided their own Kafka Connector approved by Confluent.
That makes it questionable whether you’d use the Debezium Connector when the database vendor has provided one on its own.
The implementation of the two connectors is not identical – the Debezium one tails the oplog while the Mongo’s implementation utilizes the Change Stream feature in Mongo starting from version 3.6
Still, there are some reasons you may want to stick to Debezium, as answered in a Reddit thread here:
- It’s part of a larger family of connectors for a range of databases, providing a uniform configuration surface and event format envelope (the actual change event value differs though in case of the MongoDB connector due to its nature of being a schemaless store)
- Can be used with Apache Kafka and other messaging infrastructure via Debezium Server and the Debezium embedded engine
- Can be used with the Debezium UI
- We are planning to support change streams in Debezium 1.8 (see https://issues.redhat.com/browse/DBZ-435)

Running the Example
Let’s now go through all the steps required to have our end to end process working:

You need to have Docker installed on your machine.
Each of the docker run -it commands below will leave the terminal attached to the container’s standard input and output. I find this helpful for initial experimentation as you can see all the output messages, but of course, you can run in detached mode with the -d option if that’s what you prefer.
Install Zookeeper
Run the following Docker command to install Apache Zookeeper:
docker run -it --rm --name zookeeper -p 2181:2181 -p 2888:2888 -p 3888:3888 debezium/zookeeper:1.6
Install Kafka
Run the following Docker command to install Apache Kafka:
docker run -it --rm --name kafka -p 9092:9092 --link zookeeper:zookeeper debezium/kafka:1.6
Install MongoDB
Run the following Docker command to install MongoDB:
docker run -p 27017:27017 --name mongo1 mongo mongod --replSet my-mongo-set
Pay attention that the name of the Mongo container is mongo1 (as it will be the first and the single mongo instance in the replica set), and the name of the replica set is my-mongo-set.
Configure Mongo as a Replica Set
The Debezium Kafka Connector uses the Mongo oplog that collects all the database events. The oplog is only enabled if Mongo runs as a replica set.
Let’s make sure it does by getting into the mongo shell and configure the replica set:
docker exec -it mongo1 mongo
config = {"_id":"my-mongo-set","members":[{"_id":0,"host":"mongo1:27017"}]}
rs.initiate(config)
Install Kafka Connect
Run the following Docker command to install Kafka Connect:
docker run -it --rm --name connect -p 8083:8083 -e GROUP_ID=1 -e CONFIG_STORAGE_TOPIC=my_connect_configs -e OFFSET_STORAGE_TOPIC=my_connect_offsets -e STATUS_STORAGE_TOPIC=my_connect_statuses --link zookeeper:zookeeper --link kafka:kafka --link mongo1:mongo1 debezium/connect:1.6
Note that this is a custom connectdebezium/connect:1.6
You can send a GET request for all the connectors currently set up in the system:
curl -H "Accept:application/json" localhost:8083/connectors/
This will return an empty response as we still don’t have our Mongo connector installed.
Next, let’s register the connector with the following POST call:
curl -i -X POST -H "Accept:application/json" -H "Content-Type:application/json" localhost:8083/connectors/ -d '{"name":"users-connector","config":{"connector.class":"io.debezium.connector.mongodb.MongoDbConnector","mongodb.hosts":"my-mongo-set/mongo1:27017","mongodb.name":"mongo1","collection.include.list": "testdb.users"}}'
Spend a moment to review the Connector’s configuration (the POST body) – we need to set the Mongo server, the name of the topic, the replica set, etc. Those are some minimum requirements to have the Connector up and running.
Now, if you check for the available connectors once again, you should see the following result:

Capturing Events
It’s time for the fun part and start to consume some messages.
Consuming Events via the “watch-topic” Tool
In case you’re not interested in the .NET client, you can just use the watch-topic Kafka utility by executing the following command:
docker run -it --rm --name watcher --link zookeeper:zookeeper --link kafka:kafka debezium/kafka:1.6 watch-topic -a -k mongo1.testdb.users
This will start listening to the mongo1.testdb.users topic and print out any incoming message.
Consuming Events via the .NET Client App
The .NET client code is quite short and self-descriptive.
static void Main(string[] args)
{
    var conf = new ConsumerConfig
    {
        GroupId = "test-consumer-group",
        BootstrapServers = "localhost:9092",
        AutoOffsetReset = AutoOffsetReset.Earliest
    };

    using var consumerBuilder = new ConsumerBuilder<Ignore, string>(conf).Build();
    consumerBuilder.Subscribe("mongo1.testdb.users");

    var cts = new CancellationTokenSource();
    Console.CancelKeyPress += (_, e) => {
        e.Cancel = true; // prevent the process from terminating.
        cts.Cancel();
    };

    try
    {
        while (true)
        {
            try
            {
                var cr = consumerBuilder.Consume(cts.Token);
                Console.WriteLine($"Consumed message '{cr.Message.Value}' at: '{cr.TopicPartitionOffset}'.");
            }
            catch (ConsumeException e)
            {
                Console.WriteLine($"Error occured: {e.Error.Reason}");
            }
        }
    }
    catch (OperationCanceledException)
    {
        // Ensure the consumer leaves the group cleanly and final offsets are committed.
        consumerBuilder.Close();
    }
}
It essentially starts a Kafka consumer by specifying the server (localhost:9092) and the topic (mongo1.testdb.users).
When you run the app, you’ll see the consumer waiting for new events.

Then go to the Mongo shell and insert a new record:
db = (new Mongo('localhost:27017')).getDB('testdb')
db.users.insert({name : 'John'})
Feel free to experiment with updates and deletes on your own.
The event is captured in the app and displayed to the console.
Next, let’s inspect the message format.
Message Format
Every change message contains two root fields – payload and schema.
Payload
The payload contains the inserted document and some additional metadata about the message like the server version, the operation type, the timestamp of the message, etc…
For an in-depth description, you can check the Debezium documentation on Mongo Connector.
"payload":{
    "after":"{\"_id\": {\"$oid\": \"61409a39442421f20ee6f9c6\"},\"name\": \"John\"}",
    "patch":null,
    "filter":null,
    “source” :{
        "version":"1.6.2.Final",
        "connector":"mongodb",
        "name":"mongo1",
        "ts_ms":1631623737000,
        "snapshot":"false",
        "db":"testdb",
        "sequence":null,
        "rs":"my-mongo-set",
        "collection":"users",
        "ord":1,
        "h":null,
        "tord":null,
        "stxnid":null
    },
    "op":"c",
    "ts_ms":1631623737536,
    "transaction":null
}
Schema
The schema unsurprisingly contains some data about the message format, types of the fields, whether they are required or optional, and so on.
{
   "schema":{
      "type":"struct",
      “fields” :[
         {
            "type":"string",
            "optional":true,
            "name":"io.debezium.data.Json",
            "version":1,
            "field":"after"
         },
         {
            "type":"string",
            "optional":true,
            "name":"io.debezium.data.Json",
            "version":1,
            "field":"patch"
         },
         {
            "type":"string",
            "optional":true,
            "name":"io.debezium.data.Json",
            "version":1,
            "field":"filter"
         },
       ...
      ]
   }
}
I’ve shortened the full JSON for clarity.
Summary
In this article, you learned about Debezium, Kafka Connect, and how to stream change events from your Mongo database into Kafka topics.
I’ve also presented a simple .NET consumer.
I hope that was helpful. See you next time!


